

Building a New Station – A Checklist
[February 2014] Building a radio station has many more options available today than in previous years. However, while “prosumer” gear pricing may be attractive, budgeting for and acquiring professional broadcast gear will pay off in the long run. We asked our friends at Wheatstone for some suggestions. Phil Owens comments:
One of the big challenges in launching any new station, whether LPFM or full power, is the assembly of a package of equipment that provides the reliability and ease of use required for broadcast use while meeting your budget requirements.
To assist you in choosing the right gear for your new venture, we have put together the following suggestions. They are based on 35 years of experience in providing equipment for broadcasters large and small.
Start in the Studio
The most critical piece of gear in your studio is the audio console. It is nothing less than the foundation of a good studio.
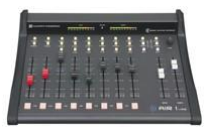
The console mixes all your sources – microphone, CD Players, PC, etc. – to create the program output that is sent to your on-air processing and then feeds the transmitter.
The console is also the most heavily used piece of equipment you will own, so its build quality and operational reliability are of utmost importance to a successful station.
By the way, do avoid those cheap mixer boards. A broadcast console should not have numerous knobs and controls for unneeded functions such as equalization or side channels – typical of many music store mixers. While you might think those controls give you more functions, they actually end up providing many opportunities to do harm to your programming!
On the other hand, a real broadcast board will offer several features not as easily accomplished on a typical mixing board, such as speaker muting.
Speaker muting turns off your monitor speakers whenever the microphone is on. While it might seem like you could be careful and do without speaker muting, the rather loud feedback produced the first time someone forgets to reduce the speakers quickly will make you wish you had a console with proper muting.
Something else that helps eliminate on-air errors is the On-Air Tally (light) control, to alert others that someone is currently on the air with a live microphone. Again, while you could operate without one, the first time you have someone barge in while you are talking will make you wish you had an On-Air light.
Live Audio
Your audio inputs start with the microphone, another important choice, because it affects so much of what you will do on the air.
It is best to pick a directional microphone with a sound you like – and then install at least two. Directionals provide better rejection of background noise. And get a microphone without an On/Off switch – your console should handle that function, avoiding having a microphone accidentally switched off on its body and unresponsive when you need it.
The microphone should be mounted on a boom arm, for easy adjustment. But do get one with sufficient strength to hold the microphone steadily in place.
A microphone processor will make a big difference in how your station will sound.

Using a microphone processor will condition your audio, giving it a consistent output level, reducing unwanted background noise, improving intelligibility, and creating the most sonically pleasing on-air sound for your talent.
The Other Sources
What combination of gear – CD players, turntables, MP3 players, tape machines, etc. – will be determined by the various media types you intend to use for audio playback.
Most stations today use a PC for playback of individual audio files. It may also be used in conjunction with automation software for playback of multiple audio files controlled by a schedule (playlist). If you want good sound quality, it is often smart to avoid the audio output on the motherboard. A decent sound card will not cost a lot.
If you plan to have any telephone callers on the air, get a phone hybrid. It separates incoming audio (the caller) from outgoing audio (the in studio talent). When these signals are handled separately you can ensure that the caller’s audio is not sent back to the caller.
Broadcast audio consoles create a return signal (called mix-minus, i.e. the program mix minus the caller audio).
Do not forget to have an EAS decoder among your studio gear; even LPFMs are required to rebroadcast emergency alerts that are received from the Emergency Alert System (EAS).
Quality Control
A set of good speakers can serve for monitoring purposes, though you may want to look into speakers specifically designed for this task. They are usually listed as “Studio Monitors.”
To feed your air monitors, a Modulation Monitor serves two important functions: (1) it helps make sure you are not modulating above FCC limits and (2) it provides an audio feed that accurately reflects what is being broadcast on the air. (Some transmitters have a deviation meter that may be adequate to display modulation levels; in this case a high quality FM tuner can serve for off air monitoring.)
“Closed ear” headphones are the best for most people for monitoring while speaking on the air. This type of headphone eliminates audio bleed (feedback) into an open microphone. Use headphones with ¼-inch plugs to match the ¼ -inch headphone console output.
From Studio to Transmitter
Once you have your audio mixed in the console, it is ready to be sent to the transmitter.
The first stop for your program audio chain is the on-air audio processor.

Your on-air processor conditions your program output before being sent on to the transmitter. It will determine your overall station sound and allow you to broadcast the loudest, cleanest possible signal without over-modulating. The processor will also contain a stereo generator to produce the composite signal required by your transmitter for FM Stereo broadcasting.
The output from the processor then is fed to the transmitter. The combination of the transmitter and antenna will produce your authorized power level. What you need will likely be specified by your FCC license or your consultant.
Depending on your antenna type and antenna height above the average terrain (HAAT) an LPFM station will typically need a 100 to 200 Watt transmitter. The antenna must be mounted on a tower of the right height. Do not cheat yourself by using a tower that is lower than specified in the FCC authorization. Do not tempt trouble from the FCC by putting the antenna higher than permitted. The miniscule extra coverage you might get is not worth the fine that could be levied.
If your transmitter is not adjacent to your studio, you will likely need an STL – a Studio to Transmitter Link. Depending upon location, you may opt for a hard wire, an IP connection from your LAN, or an rf transmitter to send the audio to the transmitter site.
One final item to be considered is the wire and coax used to connect the various parts of your station. See Steve Lampen’s wire/coax article for some suggestions on what to buy for the best results.
– – –
Phil Owens handles East Coast Sales for the Wheatstone Corporation. Phil can be reached at: philowens@wheatstone.com