

Audio Pads Made Easy

[September 2010] Even in this enlightened age when we have distribution amplifiers everywhere, sometimes we still have to use resistors to reduce a signal level between two pieces of equipment.
Here is a simple way to add a T-Pad or an H-Pad into an existing cable. It requires no soldering, and the value is easily trimmed after it is built.
The Parts List
The pad starts with a pretty short parts list: A terminal strip and some resistors.
Radio Shack sold a 12-position terminal strip block liket he one shown here.
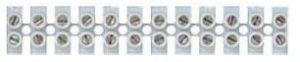
These terminal strips easily can be cut down to make three or four pads, depending upon your application. The barrier strip style is also available if you prefer, but I like to use one of these small Euro-type terminal strip blocks.
The resistors can be from your shop stock or purchased as needed.
Figuring the values of the resistors needed is an easy, quick exercise given the resources available via the Internet. There are dozens of online sites that will calculate the values you will use. For example, you might try http://www.nu9n.com/tpad-calculator.html
Building the Pad
Depending upon your needs, you can quickly assemble exactly the pad you need from a fully-balanced H-Pad, either an in-line or single-sided T-Pad, or for a minimalist L-Pad. In determining what kind of pad you need, consider both the source and the receive side of your pad.
If you have a balanced output, use a balanced pad. An unbalanced pad can ground one side of the source. This could cause a problem with any of the many balanced outputs that use nice hefty opamps; they will happily pump current into your grounds. Doing that might cause you to end up with all sorts of mysterious crosstalk and wonderment that you will have to troubleshoot later.
Here are some diagrams and mechanical drawings for the various pads, as examples.
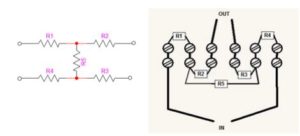
A balanced H-Pad
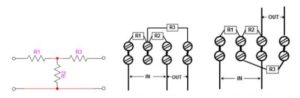
An unbalanced T-Pad with two wiring options
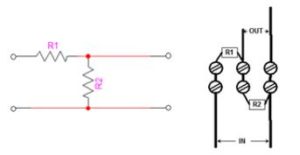
The L-Pad
Hooking Up the Wires
Once you have decided upon the pad you need and calculated the resistor values, it is a simple matter to add the parts and set them in place.
For example, here is a finished H-Pad:
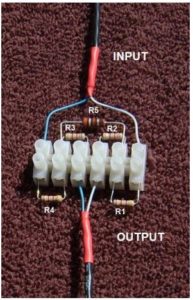
If you find, after the pad is installed, that value changes are needed it as simple as loosening the screws, and swapping in new values of resistors.
The pads may be secured to a wall or cabinet if you want, or they may be supported by the connecting wires.
– – –
Mike Callaghan was Chief Engineer at KIIS-FM, Los Angeles.