

Acoustics 101 – Understanding the Studio

[March 2021] Putting a studio together has any number of challenges, from size to how it is equipped. While Jeremy Bongirno focuses on home studios, whether there or in a traditional broadcast facility, ensuring proper acoustics deserves more than putting egg crates on the wall.
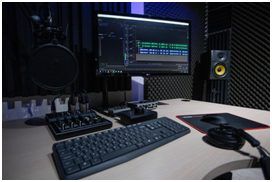
A lot thought and effort goes into having an awesome studio, whether at a broadcast station or a home studio. Some folks think that having great equipment is all they need.
You do need the right equipment – and the right space for it all. But while those are vastly important steps, an even more important factor may be ensuring your recording and production space has an adequate amount of acoustic treatment.
Honestly, you are not even close to getting the full potential out of all that fancy equipment if your untreated room is adding loads of color to the sound.
In my experience, this topic is probably one of the most overlooked aspects of setting up studios among beginners.
This material is designed to help you achieve better sound quality and acoustics for recording in your listening environment.
HELPING TO GET IT RIGHT
Now, as you can well imagine, there is a lot to discuss on this topic.
Therefore, I will advise you to take on this battle in steps. Do not feel like you need to go out and buy up every absorption and diffusion panel you find.
In fact, before we get to suggesting the first steps you might want to take, we will first begin by outlining understanding our overall goal here in more detail.
WHY IS ACOUSTIC TREATMENT NECESSARY?
We can better grasp the whole concept with a basic example.
Say your home studio exists in a garage. That type of space has a ton of potential for sonic reflections. Next, imagine yourself working on a track that is close to the mastering phase and you are attempting some strenuous mixing.
The ability to adequately execute a surgical EQ job on a track requires a sensitive ear, some quality recording gear, and a good listening environment that does not add a bunch of unwanted color to your direct sound.
THE WRONG APPROACH
If you have not treated your garage with any-thing whatsoever, you are getting an unnatural reference from your monitors.
The end result is a mix that sounds “off,” no matter what you do. This means more headaches – and more time trying to win an uphill battle.
That uphill battle is against early reflections, distortion, and unwelcome sonic coloring from your listening environment. These pests are the mortal enemy of any sound engineer or music producer.
THE RIGHT APPROACH
Luckily, we have an ally in this battle, and that ally is acoustic treatment.
This whole process of acoustically controlling your studio room has a deep impact on so many aspects of your creative process. If your goal is to make your musical visions truly come to life, then this is a topic you should take very seriously.
Treating your environment with numerous types of acoustic utilities enhances your ability to trust your ears as well as your recording and production gear. Controlling acoustics also helps you to achieve better mixes and record sounds with a more natural tone.
SOUNDPROOFING IS NOT ACOUSTIC TREATMENT
The fact of the matter is that soundproofing and acoustic treatment are not the same process.
This is probably the most common misconception about acoustic treatment, and it is an understandable one. Each is trying to accomplish entirely different things. Understanding the difference between these two methods is pretty important
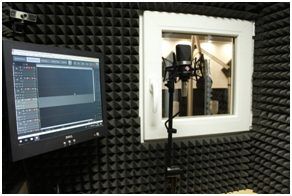
Soundproofing is effective for trying to isolate sound from one room (or environment) from another. This is great if your studio lives where you need to keep noise levels from bleeding out to adjacent spaces – and your neighbors.
Acoustic treatment is an attempt to control sound reflections, distortion, and all other distortions and disruptions.
Some folks out there might have had the idea that soundproofing does the same job as treatment. In reality, overly soundproofing your room might suffocate your naturally occurring acoustics too much.
THE INVISIBLE ENEMY: ACOUSTIC DISTORTION
Okay, so you have seen me refer to distortion and early reflections a few times already.
Now it is time to dive a little deeper into what exactly you are fighting against. In an effort to explain this loaded topic a little better, I will break up every type of common distortion individually.
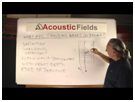
So let us talk about just how sound travels in a room.
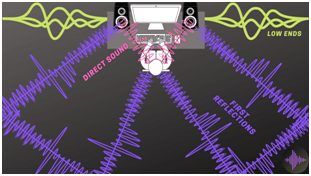
As you can see in this example of how untreated rooms perform as a recording environment, the studio monitors are the main source of direct sound.
Direct sound (highlighted in pink) is the majority of what you hear in your stationary listening position. Its tone is unaltered and its sound waves do not interact as much with the rest of the room. Basically, direct sound is not as much of a threat, but we will get more into that later.
Now, take a look at those first reflections (or early reflections). This is the first line of attack from your invisible foe. These reflections are where all of the sonic alterations start to take shape.
With no acoustic panels or bass traps, these sounds project outward in all directions and bounce from surface to surface (walls, ceiling, corners, etc.) as they make their way back to your listening position. As all of this is happening, the sound source is becoming more and more distorted by the millisecond.
Again, let us imagine your studio is in a garage and you are working on that intricate mixing job. Those early reflections, and all reflections thereafter, are giving you an inaccurate representation of the direct sound coming from your monitors. This of course leads to those head-aches we talked about earlier.
Simply describing all sonic distortions as reflections does not quite explain things well enough though. There are numerous levels to talk about here, but we start by will focusing on the most common and most well understood distortions.
COMB FILTERING
The most fundamental way of explaining comb filtering in terms of acoustics is when direct sound frequencies interact with reflected frequencies.
Those two frequencies might look to be similar if you were strictly comparing their sine waves, but those pesky reflected frequencies will inevitably be slightly delayed.
Even the most minuscule delay can cause distortions, no matter how similar their signals are. I know, earlier I said that direct sound was not a threat, and it is still not. It is when reflected sounds start getting their sticky paws on every-thing that direct sound becomes a problem in your main stationary listening position.
All-in-all, comb filtering introduces all sorts of sonic disruptions that are very much unwelcome in any listening and recording environment. You would not want to add a flanger effect to every inch of your track, right? Well, that is what is happening here.
 Check out this great video on comb filtering for an even more technical explanation.
DECAY
For this effect, think of a massive old church with a gospel choir doing their thing. If your listening position is all the way in the back on the top balcony, you would be hearing the tail end of the frequencies that the choir is producing.
Imagine the choir abruptly stops singing all together, but you are still hearing some audible frequencies traveling throughout the church that die out over a short period of time. Well, that right there is the definition of decay.
Decay is not always a bad thing, but too much of it can certainly add up pretty quickly. It is all about finding a balance between a “live” environment and a “dead” one.
As you will see as we go along, you do not want to overdo things when controlling acoustics. Al-lowing a healthy amount of decay is actually ideal for your mixes because a small amount of it naturally exists in every environment in the real world.
FLUTTER ECHO
This one is pretty straightforward. In a nutshell, flutter echo occurs when sound heavily reflects back and forth between any number of untreated parallel surfaces.
The best way to explain this is to think of a group of people playing basketball in an other-wise empty gymnasium. Now, when a player bounces the ball you will hear a reverberating echo of that sound bouncing off the walls for a second or more. That is what makes up flutter echo.
Of all the acoustic distortions out there, flutter echo is one of the absolute worst. Thankfully, depending on the size of your recording studio setup, it is pretty easy to diagnose and treat.
Some folks out there think that angled walls will do the trick, others think that diffusion panels are the answer. While those two methods might work, the most effective way of handling flutter echo is with absorbers.
And we will talk about those, too.

For now, check out this helpful video that debunks some common misconceptions about dealing with flutter echo.
ROOM MODES, STANDING WAVES, & LOW ENDS
Alright, so here is another loaded subject.
What we are talking about here is essentially sound-pressure level in a given space. Room modes/standing waves are heavily dependent on the dimensions of your studio space as well as how well-treated it is.
I am going to leave most of this explanation to another great video but standing waves mainly affect low frequencies due to their incredible length.
If you are anything like me and you have had trouble with bass frequencies sounding either too loud, or too quiet, chances are you are running into an issue with your room mode and standing waves.
Overall, this particular issue lives alongside many of the other forms of acoustic distortion on this list. In fact, you could consider room modes and standing waves to be the culmination of all types of distortion.
At any rate, check out this video that does a wonderful job of explaining all of this.
By the way, that channel has quite a few videos that cover this topic very well. If you are keen on learning more about standing waves – and a whole lot more – I highly recommend checking out everything these guys have to offer on achieving better bass frequencies in smaller rooms
Next up, in Part 2 of our discussion, we will show you how to treat your studio to have good acoustics.
– – –
Jeremy Bongiorno has been a musician and producer for over 15 years. He is an author on his website of a number of articles tips, guides, and evaluations focused on studio and equipment needs. You can contact him at: jeremy@studiofrequencies.com