

Unexpected Changes – Now What?
[December 2018] In an era when many transmitter sites are visited infrequently, most good radio engineers pay close attention to operating parameters. When something happens, how one proceeds is important – and how fast. Waiting until there is “smoke” can be very expensive in the end. Clay Freinwald explains.
Chasing slow changes in transmission system parameters can be an interesting detective job, especially when a lot of power and/or current are involved.
While investigating, I have found that some of the more useful tools in the field are the infrared thermometers and cameras.
A Poor Connection in Seattle
Bonneville Seattle has two AM stations with transmitters located on Vashon Island in Puget Sound near Seattle. KIRO/710 (50 kW – DA-N) and KTTH/770 (50/5 kW – DA-2) – which is also diplexed with iHeart Media’s KFNQ/1090 (50 kW – DA-2).
Last August I received a call from Bonneville’s Steven Allen (their transmitter engineer) telling me they found a hot connector on KIRO. Steven, who constantly looks for anything abnormal, first spotted an overheating connector by feel, then by using a point and shoot IR thermometer, and finally using a FLIR camera that clearly showed what was wrong. I like to think of the FLIR as producing a thermal-x-ray.
The connector was rebuilt and was right back to its normal temperature. In the process, the value of these two tools became clear.
Another Headscratcher
Fast forward a couple of months to October of this year and a new issue.
This time the problem was with the 770/1090 array, just down the road. The antenna monitor was telling Steven that something was changing in the antenna system. Because both stations are running 50 kW, one really wants to pay close attention to these things.
Specifically, the antenna monitor parameters on tower #3 had started going out of tolerance for both the 1090 and 770 systems. Steven kept adjusting the phasors, but eventually he ran out of ability to bring them back to “normal” numbers. Something was going wrong out there! It was time to contact Hatfield and Dawson for some advice and suggestions.
Again, keep in mind this is a 3-tower diplexed array, with a lot of components that could be causing the shift.
Considering Possibilities
Ben Dawson, who always likes a good challenge, got involved. Steven sent a picture of the connection at tower 3 to Ben, who agreed this would be a good place to start.
The primary suspect was the bond between the ATU and the tower, since some of these do have less than desirable connections (over the years, I have seen all manner of connections to AM towers – perhaps the most memorable was a finding a very rusty set of Vice-Grips clamping a piece of copper tubing to a tower).
Steven wanted to check out these connections, knowing that a poor connection, especially with this much power, would likely be getting warm (just like that coax connector at KIRO). So he set out to take the temperature of the connections to all three towers using his point-and-shoot IR thermometer.
Comparing Towers
To establish a reference, he started with towers 1 and 2, and found the connections to be “air temperature” or about 56 degrees.
When he got to tower 3, he noted that the temperature of the top connection (they are clamped in two locations, one above the other) was, like the other towers, 56 degrees. However, the lower connection was 58 (two degrees higher). And this was where things got really interesting.
Checking the temperature of the tower leg below the ATU connection point showed progressively higher temperatures. Then, pointing the device at the base insulator produced a reading of 150 Degrees!
Quickly returning to towers 1 and 2 showed their insulators to be cool – the same as the air temperature. What was going on?
Steven quickly called the Bonneville and iHeart Media’s Chief Engineers to report his findings.
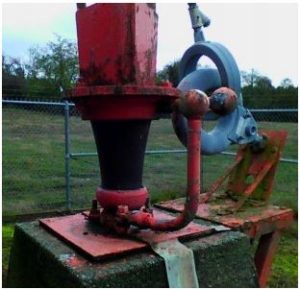
Close Inspection
Shown here is the base insulator of Tower #3:
And, here is a closer view.
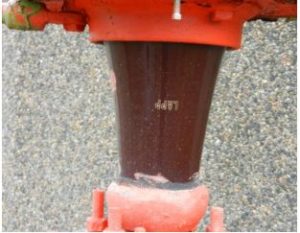
All looked, on the surface, to be “normal.”
Why the IR Tools Are Important
Recalling the experience with the hot coax connector at KIRO, it was time again to bring out the FLIR cameras and see what was going on.
Interestingly, both Bonneville and IHeart now had them, and soon brought them out to the site. The thermal images clearly showed the insulator was getting just a bit warm.
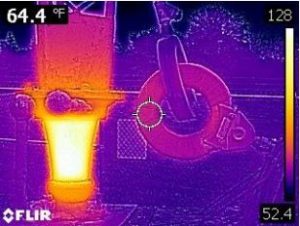
Notice the temperature scale on the right
The pictures were transmitted to Ben Dawson as well as other engineers at iHeart. Now they knew where the problem was – but the question was: Why?
Isolating the Tower
To get to the bottom of the matter, both stations were put in Non-Directional Mode (something that normally does not routinely take place) so that Tower 3 could be de-energized and the insulator inspected.
Now, in Stevens own words, what happened next: “At the base of the tower above the insula-tor the is about a one foot well with drain holes on four sides, moss and debris had blocked the drain holes above the insulator. In this well we found a partially decomposed rat and an old bee hive.
“On the insulator, there is a stainless steel plate, glued with Mastic material to seal the hole used to access the void in the insulator.
Upon inspection, it looked like rain water pooled and may have found its way past the mastic material into the void, filling it up. We also found out that condensation can build up in the void if the drain hole is plugged.”
Fixing the Problem
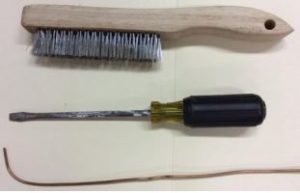
Often High-Tech tools are not required.
Using a wire brush and custom fabricated poker made out of #12 copper wire, they found the drain hole that had been plugged with debris. When cleared, the water within the bases insulator drained fairly rapidly. Thankfully, a close inspection of the insulator showed it was not cracked or otherwise mechanically compromised which would have led to more issues.
But Then There Was Smoke!
The process of getting things back to normal produced some surprises as normal power was applied again to tower 3.
A puff of smoke appeared from out of the insulator! Apparently, the RF was now burning what was left inside the insulator. The team has a video of the moment – they are happy to show a bit of smoke coming from a very unusual location.
By later in the day, the smoke had stopped, and the phasor adjustments were back to where they were supposed to be. The antenna monitor was again happy.
Lessons Learned
As with all adventures of this nature, there is a plus side (beyond the immediate corrective action).
There are some significant lessons learned with this event on Vashon Island that can apply to all AM station antenna systems, not just those with 100,000 Watts of RF.
Here are a few that come to mind:
- When your antenna monitor indicates other than routine seasonal changes are taking place, it is time to play detective to find the reason behind the change. Good sleuthing can pay big dividends.
- A point and shoot thermometer is a “must-have” piece of equipment at all broadcast plants. (Personally, I have a Fluke Model 62 Max), however less expensive ones are commonly available and useful. In this case, it was not the absolute temperature that was the issue, but rather the temperature comparisons that led to the culprit.
- Consider getting a FLIR camera. You will find this to be a very valuable tool that will help you understand what is taking place, and why, after locating a suspected issue with your point and shoot thermometer. Here is a link for the camera that Bonneville was using.
- Do not hesitate to take your IR thermometer outside looking for signs of heating, a lot of issues can be located early within ATU’s, on the filters, etc. It is good to establish base-lines so you will know what runs warm – and what is too warm.
- Pay close attention to how your AM tower is connected to the ATU. Cad-welding the connection to the base-plate is a good way to eliminate some unwanted and untimely variables.
- Routinely check your base insulators – not just for mechanical issues like drain holes. Take their temperature, too.
- As you might guess, the problem on Vashon Island could have been made a lot worse had the water inside the insulator been subject to a “hard-freeze” – and cracking it. Replacing a base insulator may not a project for the average local tower guy.
- Remember that not all base-insulators are made the same way. Some of them may be oil-filled, some are solid, etc. Overall, in many cases they just are old and should be on your watch list.
- Keep a list of the insulators you have in service at all times, and where to obtain replacements in a hurry. Do not be surprised if the insulators you have are no longer made or the manufacturer is long gone.
- Inspecting the insides of base insulators also is worth the effort. Consider adding a Borescope Camera (with lights) to your tool box. For just over $100, you can get a clear picture of what is going on inside the insulator.
- If you have a multi-tower array, can you operate Non-Directional from more than one tower? The ability to do this enabled tower 3 to be inspected during the day.
- That same ability at KIRO, allowed them to operate non-directionally on the “other” tower while we repaired the overheating – and about to fail – connector.
If your system has this capability, use it, test it, and make sure the instructions are available for the next guy.
– – –
Clay Freinwald, a frequent contributor to The BDR, is a veteran Seattle market engineer who continues to serve clients from standalone stations to multi-station sites.
You can contact Clay at K7CR@blarg.net