
The ‘ole Comtech Dish Just Ain’t What She Used To Be

[August 2011] There are not very many stations today without at least one satellite dish for programming. Perhaps yours went in years ago and has worked well. Alan Alsobrook wants to alert you to a potential problem, so you will be ready if it happens.
Do you still have a Comtech dish in service? Many stations have these dishes since they were supplied with the DART satellite receivers back in the early 80’s. If so you will want to read this article.
Most of those Comtech dishes came with a Teflon, or composite, feed horn mounting plate. If your dish has one of these and it has not already failed, expect that it will soon.
The Problem
What happens is that the material used in the plate has been attacked by Ultra Violet light over the years and, eventually, it just starts falling apart. If you have not checked your mount regularly, your first warning is likely to be loss of signal on all satellite receivers connected to that dish. If that happens to be your only dish, it is not going to be a good day.
I recently had a station experience this. For this station we were lucky that only the screws that mounted the plate to the support arms had come loose, causing a low signal but we still had reception on most of the birds.
A visual inspection quickly confirmed the problem, when I saw the feed horn pointing below the center of the dish.
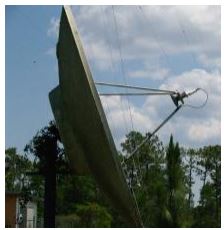
The feed horn is askew in relation to the dish
Careful placement of my trusty old Buck knife was able to restore a missing program feed until I could make more permanent repairs.
Temporary measures got the signal back
A Do-It-Yourself Project
I started by making a call to DAWN Co. They had a repair kit available that replaced all the support arms and feed horn mounting. The price was just under $1000.00 As you can imagine, I was not very enthusiastic about that option.
So I decided to go to the local hardware store and see what I could find locally to make repairs.
After a few trips up and down the aisles, I ended up with:
- a strip of 1/8-inch x 1 ¼-inch flat aluminum stock,
- a 4-inch diameter stainless worm gear clamp,
- and six ¼-inch-20 stainless ¾-inch nuts
- various bolts and cut washers.
Preparing the Hardware
To reduce downtime, I prepared all the hardware in advance.
First I cut out three 4-inch long sections and made two 90-degree bends, 1-inch from each end giving a C shape. I then predrilled one end of each of the three straps centering two holes ¾-inch apart to match the existing holes in the feed arms.
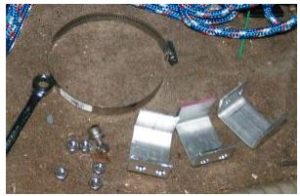
The repair parts on the bench, at slightly less than $1000
One thing I will remember for the next dish repair I do is to make a ½-inch wide notch on each side of the C piece, where it mates with the feed horn. I would do that by cutting two slots about ¼-inch deep, and bending the tap towards the feed horn about 30°. This would give a place for the stainless steel strap to sit and lock the feed horn in place better.
Start the Repair Smartly
With the repair parts made it was a fairly painless job to set up a ladder and remove the old feed mount cut the feed horn out of it.
By the way, before you try this yourself: if your feed horn is still in place it would be a very good idea to take a picture of the feed horn positioning, or at least make a careful note as to the polarization positioning of the LNA.
It will save you a lot of time later. Trust me on this.
Pulling the Feedhorn and Mounting Plate
The cutting out of the mounting plate presented a bit of a challenge. Even though the plate was crumbling, it just did not want to give up the feed horn.
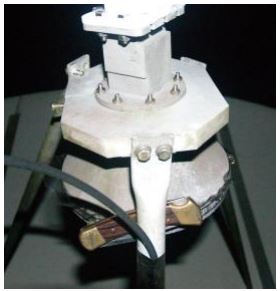
After a bit effort I was finally able to break out a section and remove the feed horn. A hack saw would likely make the job much easier. Once I got the feed horn on the bench and disassembled everything, the problem with the broken mounting plate was obvious.
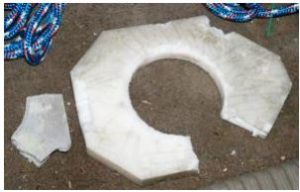
This mounting plate was not going to be of much use
Putting it Back Together
Now it is time to start rebuilding by attaching one of the new C adapters to each feed arm.
The aggravating component was trying to keep the feed horn and the C adapters from squirming out of the assembly as I was trying to tighten up the clamp (hence the reason for wanting to add the small cuts and bent tabs next time).
After getting the feed horn back in place, it is probably be a good idea to tweak up the LNB, and dish. You might note in the following picture that I somehow decided I would reinstall the LNB 90° off axis.
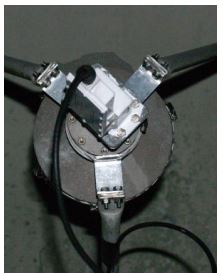
That does not work very well. So let me repeat the part about taking a picture before you start. (I did not look at my pre-repair picture until after it did not work, oops!)
Final Touches
Tweaking a dish without a Starguide receiver and the Starguide relay logging program takes a bit longer than it used to. If you have not done it before you can log into the XDS receiver by putting the URL into a web browser and using the User Name of Tech and Password of Radio.
Once in, you go to the tuner information and refresh your screen after each adjustment.
(A side note: I am sure someone out there who is an experienced programmer could throw together a nice metering program for the XDS in about an hour or so. That would make this process much easier.)
To conclude: this job was accomplished in about four hours – most of which was the manufacturing of the replacement parts, which cost about $20.
– – –
Alan Alsobrook is a contract engineer based in St. Augustine, Florida. You can contact Alan at radiotech@bellsouth.net