

Brazin’ in the Sun

[August 2010] One of the skills a broadcast engineer may have to practice at some point is brazing. That is, where a filler material is heated and used to form a sealed joint with two pieces of metal. The resulting bond creates a strong joint at low resistance.
If you are lucky, you know someone who knows how to braze who can teach you hands-on. If the opportunity presents itself, take advantage of it.
Now, here is the bad news: SBE does not offer certification in brazing. The good news is that for those of you who may find yourself faced with station construction or a repair job that requires brazing and do not know how to braze, this article is an attempt to give you the benefit of what I know.
Brazing 101
Overall, you will find brazing easier to learn – but still a challenge – if you already know how to solder.
Soldering is pretty basic: After properly cleaning the surfaces, you use an iron to heat a terminal and a wire to the right temperature. Then touch the correct gauge of rosin core solder for the right amount of time. Voila! You have a bright, shiny, strong solder joint.
Brazing 101: When brazing, you will find you need:
- a lot more heat
- more attention to cleaning surfaces
- a different melting metal
- on a separate source of flux.
The kind of brazing we use most often in broadcasting involves silver solder. Silver of course has a much lower resistance than solder we use to join wires in circuits. Silver melts at a higher temperature. Silver is structurally stronger than solder. Did I also mention it is more expensive?
Above All, Be Safe!
Before we go any further, we need to talk about safety for a minute or three. If you braze without all or any of the following, I will not visit you in the hospital:
- eye protection
- long sleeves
- heavy pants
- a fire extinguisher
Furthermore, if you braze in an area that is not well-ventilated, has a lot of flammable materials nearby, or without a good-sized supply of water and a fire extinguisher handy, I will not attend your trial.
Out On the Ground
The construction or repair of an AM ground system must be done with both low resistance and durability as goals. As you gather by now, this requires a lot of focused heat.
Taking the proper heat source into the field to produce acceptable silver soldered or brazed connections is a bit tricky. Some people rent or own an electric or gas welding rig that will produce all the heat they will need – and more. On the other hand most folks who lack the experience and proper equipment have tried with little or no success to use a standard propane torch.
Hot Enough
Once you have tried this and failed, there are two possibilities – actually three within the resources of the average broadcast engineer:
1. A MAPP Gas Torch
2. A MAPP/Oxygen Torch
3. Using both together
To get to talking about #3, you have to understand why a standard propane torch does not work for brazing or most heavy duty silver soldering. It simply does not produce a flame that carries enough heat.
What is “hot enough?” Hot enough is the temperature at which the work site melts a brazing rod touched to it, allowing the flow of metal in the rod to the materials to be joined, without destroying the adjacent metal.
For example, silver solder typically melts at around 800 degrees Fahrenheit, a little more than twice the temperature needed for standard solder. More importantly, though, the torch used needs to be able to deliver enough BTUs to properly heat the work. That does not sound too hard, does it?
Actually, if you have ever tried to solder a wire to a copper strap with a 25-Watt pencil, you have seen what happens when there is insufficient heat – poor or cold solder joints. In fact, the brazing process can be full of hair-pulling, teeth-gnashing frustration due to the properties and the size of the materials you are trying to join.
Furthermore, just as you do not want to try to braze without adequate heat, using too much heat can compromise the integrity of the metals themselves.
Complicating matters even more is the fact that while copper itself is an excellent low resistance conductor of electric current – making it useful to build good ground systems – it also has the downside of conductive properties which are able to carry heat away from your work area faster than you can maintain the proper brazing temperature. For all practical purposes when it comes to heating the strap, you might consider it to be of infinite length when it comes to its ability to conduct heat away from where you want it. One analogy I like involves trying to maintain pressure in an automobile tire with a hole in it.
This sort of problem is especially manifests itself when you use a heat source that cannot achieve a high enough temperature/heat transfer for the materials you are trying to join and the mass of the copper nearby the proposed joint.
A Practical Example
Consider a 4-inch wide copper strap in the middle of a field. Let us say you are trying to bond a piece of heavy gauge copper wire to it.
Ed Sogge with Com Plus – a top notch tower company located on the Left Coast – gave me the valuable insight. He heats the general work area with a MAPP/Air torch and, when the work area is hot enough, heat the part of the work area to be brazed with a MAPP/Oxygen torch. I will be darned if this does not work like a champ!
This technique comes in especially handy for ground system repairs involving wide, heavy copper straps. Of course, if you are thinking this might take more than one pair of hands in some circumstances, you are exactly right.
How it Works
Perhaps an illustrated example of this technique will make the process clearer. Check out this picture of a ground strap that is at the point of failure.
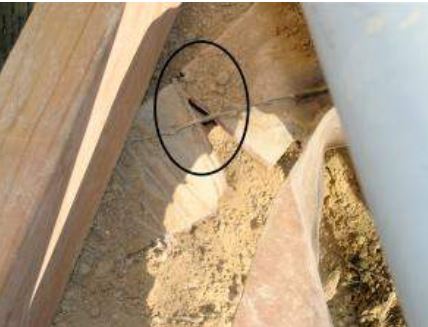
This ground strap is almost completely torn apart
The part of the strap out of frame to the left has a good many radials firmly attached to it. Redoing the entire area would be time consuming. I decided to thoroughly clean the two sides of the tear, and braze in a copper patch.
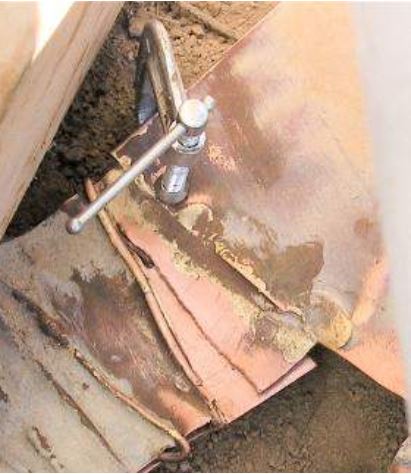
A copper “patch” is in place prior to brazing
As you can easily see, there was a whole lot of copper that needed to be heated for this repair, and I tried Ed’s technique.
Safety First!
Before attempting the repair, I made sure to take some of the precautions mentioned above. Using some old, heavy steel rack plates, I surrounded the area to avoid setting on fire some nearby wood forms that were in place for a new cement pad. I also brought out to the field a large fire extinguisher and a generous supply of plain water.
Cleaning the place where the copper was to be joined was accomplished using a combination of a bronze wire wheel chucked in a high speed electric drill, fine grit abrasive pads (used to clean painted surfaces), and fine crocus cloth.
A liberal coating of brazing flux was applied while all surfaces were clean and shiny. If there is any chance that oil or grease is present, clean it off with a good solvent. Additionally, remove any small foreign particles, such as emery dust, by wiping the joint with a clean, dry cloth.
The first key to success: all joint surfaces must be absolutely clean.
Lighting Up
Now it is time to light up the torch and braze the work. Perhaps a step-by-step checklist will help to make sure you get the best results from the process. Putting these to work on your own repairs, remember always to follow the manufacturer’s instructions for lighting your MAPP Gas / Oxygen torch.
1. Connect your torch to the MAPP gas and oxygen bottles and hand tighten.
2. Orient the gas bottles according to manufacturer’s instructions. Make sure your work area, while well-ventilated, is protected from strong drafts and wind that can easily blow out your torch –especially when it is cold.
3. Barely crack open the MAPP gas valve.
4. Ignite the torch – the flame will burn yellow.
5. Every so gently – and I mean really gently – open the oxygen valve.
6. Watch the flame go from yellow to blue. If you open the oxygen valve too fast, you will blow the flame out.
7. Safety First! At all times, be aware of where the flame is to avoid burning unintended objects. If the flame blows out (and it will while you practice and learn), make sure you turn off both the oxygen valve and the MAPP gas valve and start again.
8. If you open the oxygen valve as carefully as you should, you will see a large blue flame. Inside that outer blue flame will be a bright blue and relatively small cone of flame.
9. This inner blue cone is the hottest part of the flame and should touch the part of the work you are trying to heat.
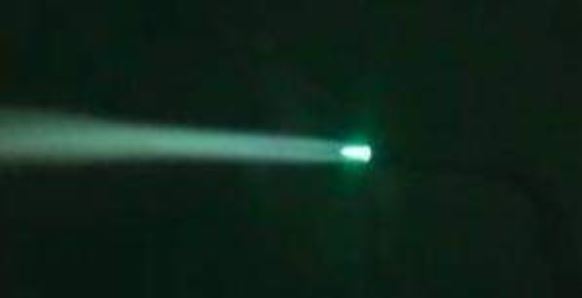
The tip of the inner cone is hottest point.
10. When finished turn off the oxygen valve first – and then the MAPP gas valve.
11. Carefully place the torch where the still hot tip will not burn you or something else.
Putting it Together
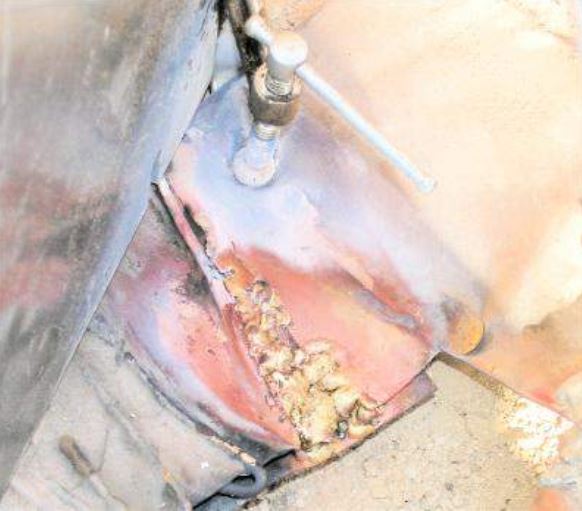
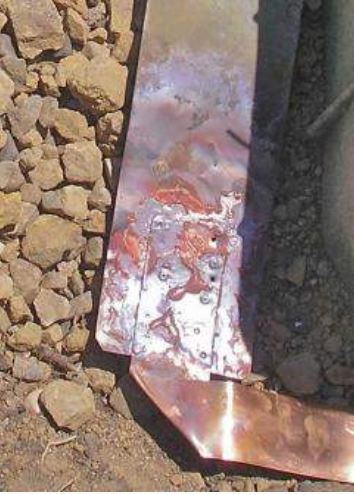
The completed repair.
Caution! It is still very hot!
The photo of this particular job does not show a really smooth flow of brazing material – even though I did use two heat sources. Crews that do brazing all the time often can make it look like melted butter. The rest of us have to be satisfied with a clean, strong bond.
The reason it takes a lot of practice to get a “perfect” braze weld is that while having enough heat is essential, too much will burn through the work pieces. The general goal for brazing that you will find in most texts on the subject is to get the work “red hot” – hot enough so the brazing rod will melt when touched to the work, allow proper metal flow and bonding, yet not burn through the work. Several brazing tutorials suggest the work glows “red hot” when at the proper temperature.
This condition is a bit hard to see in bright sunlight at the bottom of a trench. While nighttime brazing might help you to visually learn to identify the right temperatures, you should learn in daylight how to adjust the gas ratios to achieve a flame with a well defined, inner blue cone, heating the work area with the tip of the blue cone.
Let the Filler Follow
While you must direct the heat to a wide area surrounding the joint, the trick is to get the interior facing surfaces of the potential joint to proper temperature. Filler metals follow the greater heat source, so you heat the work so your filler metal melts, flows, and bonds to the surrounding area first – and then to the actual joint.
When brazing a small assembly like two #12 bare copper ground conductors, you should heat the entire assembly to the flow point of the brazing filler metal. If you are working with a large assembly like bonding two pieces of 4’ ground strap, you must heat a broad area around the joint.
It is not a good idea to direct heat solely on the joint surface. This can lead to premature flow of the alloy that does not sufficiently bond to surrounding metal.
A technique I like to use for strap repairs involves first fastening the repair joint with copper pop rivets, and then brazing. If you have trouble finding them, copper pop rivets are available from building material suppliers for copper flashing.
Brazed joint after copper pop rivets were installed.
Yes, we ran out of 4-inch strap.
What kind of brazing rod is right for ground system work? Burt Weiner (Burt Weiner Associates) suggests a type of rod made from an amalgam of silver and phosphorous. This amalgam does not require as much heat to flow as regular brazing rods, yet produces good results. It is marketed under various brand names. The best place to find it, as well as flux and other useful stuff, is at a good full service welding supply shop.
High content silver brazing rods do work, but they will cost anywhere from four to five times as much as the amalgam and sometimes do not produce as good results.
One other useful thing to remember when you go shopping is to buy a number of cheap metal “C” clamps that you will not mind heating up in the process of keeping materials together while you braze. There are other metal clamps you may find useful that are built around Vise-Grip ® technology, but cheap “C” clamps work great for me.
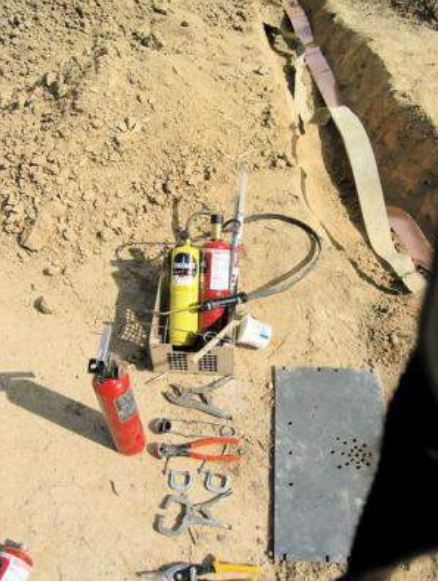
With the right tools,
you are ready to braze in the sun.
To wrap us this discussion, here is my advice to anyone needing to make a good brazed connection:
1. Assemble your brazing kit as outlined above.
2. Think and practice safety for yourself and your surroundings.
3. Practice brazing before you have to do it for real.
4. Once you learn, teach someone else!
– – –
Richard Rudman is a long time engineer in the Los Angeles market, and Past President of the SBE. Con-tact Richard at rar01@earthlink.net