

Balanced Audio on a USB Port

[August 2019] A lot of broadcast studios is not unusual to find consumer or “pro-sumer” audio gear, which is usually unbalanced. There are several solutions to convert to a balanced audio. Alan Alsobrook shares one of his solutions.
In the current Internet of Things (IoT), it is now common to have USB everything, and could include a USB sound card trying to work with pro-levels of broadcast audio.
Unfortunately Most USB audio devices are unbalanced. This actually makes sense because due to the limited supply Voltage the USB audio device is going to have a hard time working with audio levels above -10 dB.
Seeking a Balanced Solution
I have had the occasion to try several of the USB devices.
Even those that were sold as “Pro” devices and they all had the same difficulty in that when you give them pro-level audio you would get high distortion.
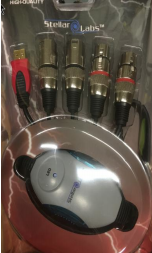 Fortunately, I found a rather inexpensive USB balanced audio device at MCM Electronics (who no longer exists) and, having tried it out, found that it was as good as the other USB devices, but had the same problem with prolevel audio. The device is the Stellar Labs USB Audio Interface.
Stellar Labs Audio Interface
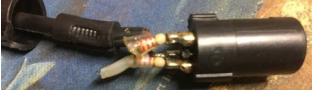
Actually, when I first got it I was not exactly happy to find it did not identify the left and right connections.
However, it did not take me very long to decide that they just did not understand at the factory where the color bands should be – and some easy modification was in order.
The unit did have red color bands on the input XLR’s and black color bands on the outputs. After verifying which channels were which on the cables, I swapped the red color band from the left input with the black band from the right output. To save some time figuring out which is which, with the cable placed flat where the outputs are to the left, it will be left in, right in, left out, right out.
Dealing With the Level Issue
After completing the band swap, I knew, in the applications I wanted to use it in, it needed to be able to accept real pro-level +4 dB audio.
Of course the easiest way to do that would be to attenuate the input audio with a pad.
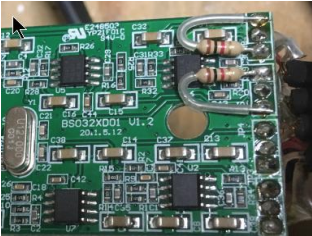
Drawing from previous audio pad work I had modified the traditional H pad to a C pad for high Z input devices. I am not sure what old school audio engineers would think of this practice, but it does work quite nicely.
After a bit of calculation, I decided on using a 15 dB or so pad made with a 2.2k resistor in series with each of the input lines and a 1k resistor on the board side parallel across the input lines.
Installing the Pad
The actual placement of the pad was a bit more interesting.
The way the board is laid out it did not look like it would work well to have the series resistors on the audio board, so I placed them inside the female XLR.
After that, the parallel 1k was an easy drop in across the input lines at the board.
So far this modification has worked out quite well in the field.
I actually started doing this around 2010 or so. Once I modified them, I would simply use a sharpie and write “+4” on the container for the actual audio board. Of course, if you like this approach you can get as fancy as you like in identifying it.
As for the output, it is still going to be a bit lower than true Pro audio but in practice it has not been a problem.
Operating Specifications
At this point, you might be wondering what are real world specifications for these devices, since there are none in the documentation.
While I was working with them here is what I found:
As shipped –
Input Impedance is 24k Ohms
Max input level before distortion -1 dBu
Modified –
Input Impedance is 4.3k Ohms
Max input before distortion +14 dBu
Audio Output with a -6 dBfs 1 kHz signal was 0.43 dB at 0.008% THD.
I would imagine the modifications that I made would be applicable to most any balanced audio interface US device,
I just liked the Stellar’s version because of it being inexpensive and it has cords so you do not have to make room for a box somewhere. It comes with 6-foot cable from the USB connector to the board then another 3-feet of audio cable from the board to the XLR connectors.
If you are interested in one of these devices they are still available via Newark as part 555-15817 for $45. They may also be available under different brand names elsewhere.
– – –
Alan Alsobrook is a regular contributor to The BDR. He is contract engineer based in St. Augustine, FL Contact him at: aalso@bellsouth.net