

Acoustics 102 –Treating Your Studio

[May 2021] Jeremy Bongirno returns with the second part of his discussion on things you can do to improve the acoustics your studio. The idea is not perfection, but improvement.
Now that we understand our enemy a little better and we have taken an in-depth look at all the forms of sonic distortion, it is time to strategize our defense.
I want to stress the fact that you do not necessarily have to do all of your treatment at once, but there is a good baseline to follow at the beginning. Again, we mention reflections a lot in this article. The reason for that is because that is what needs to be dealt with first and foremost.
A Very Good Place to Start
One of the most beneficial first steps you can take is to use whatever tools you have at your disposal to evaluate the state of your studio environment.
Determine the size of your room by physically measuring it, and sonically measuring it with one of the software tools from earlier in this article. Next, take note of the materials fo which your room is made. For example, whether or not the floor is wood, stone, or carpet. Make some adjustments if necessary.
A lot of this is dependent on where exactly your studio lives, so it is worth spending some time to take some meticulous notes on these factors.
First Reflections First
So how do you identify and deal with first reflections, you ask?
It all starts with treating the main surfaces of your studio environment with broadband absorber acoustic panels. Basically, your first step is to absorb as much distortion as possible, especially if you have a small studio.
The initial critical zones you need to treat are:
- Walls – focus on parallel walls the most, to kill any flutter echo that might occur.
- Ceiling – no need to go crazy here, but treating your ceiling helps to control de-cay time.
- Corners – otherwise known as “bass magnets.” Corners really need attention as quickly as possible.
- Studio Desk – the wall behind your desk should be treated fairly well. Also, isolation pads for your studio monitors are a must.
Definite Improvement
All of this is to say that you can go a long way with just a few minor treatments.
Let us take a look at how our room in the graphic from Part 1 reacts to sound with even this small level of treatment on the critical zones.
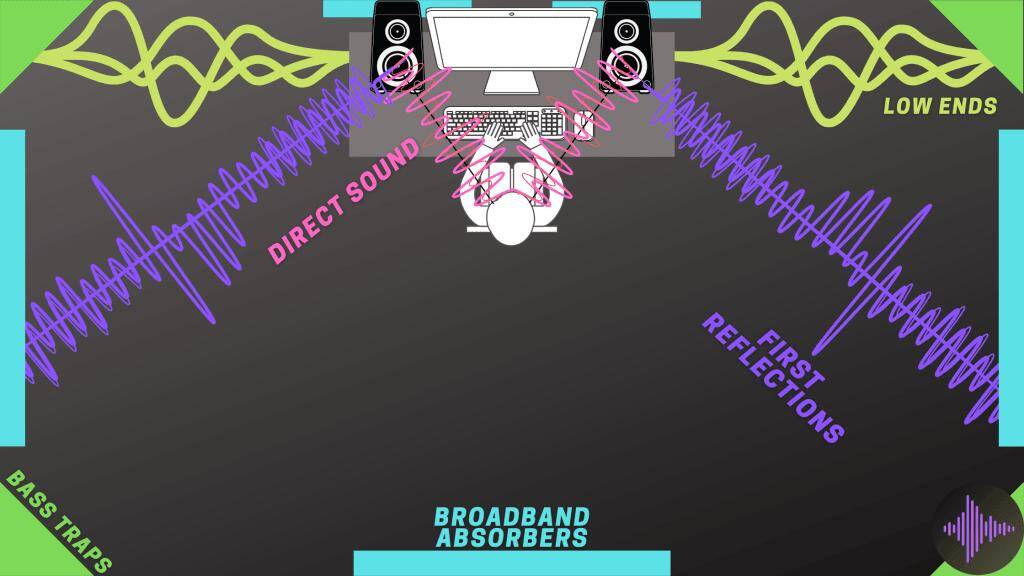
As you can see, those early reflections are not bouncing off the walls and altering the sound of those monitors as much. This is exactly what we are looking for.
Measure Your Room
There is a second step you can take in your early ventures of controlling sonic distortions in your room – software tools.
These software tools are used to measure your room via sound waves. As we learned earlier, room modes and standing waves are dependent on the dimensions of your studio space. Those two forms of distortion is where these tools come in handy.
I will say that you should not think of these tools as the answer to all your problems, but they are useful in their own way.
For example, AcourateDRC is a paid tool that does its job quite well. Room EQ Wizard is a free room measuring tool, and the more popular option.
And I will say it again, do not rely too heavily on these tools, they are simply meant to give you a good reference point.
Sound Absorption vs Diffusion
Before we get into some next level treatment strategies, I want to clarify the difference between absorption and diffusion.
My main point throughout this section is that diffusion is a step you should wait to take until later on, but it is very useful in its own right.
Sound absorption is meant to actively remove reflections in order to create a “dead zone.”
Conversely, sound diffusion is meant to actively deflect sound and spread those frequencies evenly across a given environment.
Diffusion is a very expensive endeavor to take on, hence why I recommend it for later on, when you are ready.
It does make for excellent acoustics in a listening and recording environ-ment, but it is not necessary early on.
First: absorb those reflections and take it from there.
Live End Dead End (LEDE)
I know that some of you are itching to know what to do after these basic first treatments.
So now let us get into some more advanced tactics to take as you progress on your treatment journey.
LEDE is an acoustic treatment concept with a storied history, particularly for control rooms. That does not mean you cannot use this method in a home studio though. While I would not recommend going down this route if your room is tiny, it is effective for most mid-to-large-sized studios.
The concept is simple: heavily treat one end of the room (where your studio desk is located) with broadband absorbers to create a dead zone around your monitors. The live end of the room (where vocal or instrument recordings occur) is treated with diffusion acoustic panels for ambience.
That is where the name comes from. Now, let us break down the two ends of the room in a little more detail.
Fundamental Treatment
Dead End Treatment is the fundamentals of all the other methods of treatment that we have already covered.
Throw some broadband absorbers on your parallel walls and the wall behind your studio desk. A good Rule of Thumb there is to cover 22-30% of the main wall behind your desk, focusing on the small area behind your monitors.
Stick some bass traps in the corners for bass frequencies. Put some isolation pads underneath your studio monitors. Treat the ceiling directly above your desk for high frequencies. You get the idea.
The main idea is to heavily control sonic distortions around the area where the intricate work happens.
The Other Side of the Room
Live End Treatment is a tad bit more complicated because it requires a level of finesse.
Your main goal on this side of the studio is to create an ambient environment for recording. This helps to achieve a “natural” sound to your recordings.
The only thing you need to do over here is to put up some diffusion acoustic panels and some bass traps in all corners of the room. It is true that diffusion panels can cost a pretty penny, so you should know there are plenty of other ways to diffuse sound.
One way is to use a bookshelf, but make sure to place books in there in a jagged pattern. A second option is to hang some guitars or decorations in a coordinated manner. Do not feel the need to throw an arm and a leg at some diffusion acoustic panels.
There are a lot of fun and creative ways to create ambience in your room.
Overall, LEDE is a classic method used by many studioheads, audiophiles, and professional sound engineers over the years.
This is about as complete as it gets when it comes to acoustic treatment in a studio.
Coupling & Decoupling
If you have ever watched a speaker produce sound, I am sure you have noticed the vibrations that occur on the speaker membrane.
The issue that arises from these vibrations is that if your speaker enclosure is not properly controlled, you get some sonic inaccuracies and occasional rattles.
There are two ways to handle this problem.
Firstly, the most common method is decoupling. This method attempts to reduce the severity of vibrations from bass frequencies between your floor and your speakers via damping pads. These devices act almost the same as absorbers, and they are ideal for most floor and speaker types out there.

The second method is a little more nuanced. Coupling is used to try and join your speakers with your floor with such tools as speaker spikes. This method is more ideal for dense floors like concrete which is seldomly seen in home studios.
All in all, coupling and decoupling is the route to go if you feel like going the extra mile. It is not the most necessary thing to do, but depending on the room where your studio lives, it can make a difference.
Cornering Those
Pesky Low Frequencies
No matter what studio environment you have you will inevitably have corners.
As we noted earlier, corners are bass magnets. Standing waves love to live in the corners of your room, and if left untreated, you will be hard-pressed to get your bass mixes to sound right.
Low frequencies are probably the most annoying to control and deal with. Broadband absorbers are not even close to being enough. The only way to go about this is by using bass traps in all corners of your room.
There are a few different types of bass traps out there. Some of them are better for strictly absorbing low frequencies, other bass traps have the ability to handle a broader range of high frequencies. I briefly mentioned this earlier, but the back wall on the live end of your room most definitely needs bass traps.
The last thing you want is low frequencies interfering with your sensitive vocal or instrument recordings.

Bass traps are an incredibly important piece of the acoustic treatment army, and they should not be overlooked. Believe me, if you are a producer who loves using 808’s, you will notice a massive difference in your mixes with some bass traps thrown up in all four corners of your listening environment.
Finding a Balance
The key to tending to your studio acoustics is to not overdo it!
It is definitely easy to go a little overboard with acoustic panels, bass traps, and diffusion panels. However, you do not want to completely drown out all of the nuances of your listening environment. Again, your goal is to control, not kill all of those naturally occurring sonic reflections.
You want to find that sweet spot between having an environment that is great for mixing and recording and an area that leaves some breathing room for creating music.
Buying or Making the Panels
Lastly, it might be beneficial to research some ways to treat your room acoustics with some DIY methods.
If you consider yourself to be somewhat of a crafty person, you can make this a really fun project to take on.
You can make your own absorbing and diffusion acoustic panels at home with a handful of materials including dense foam. This could be a great way for you to learn what is too much (and what is not enough) before dropping a boatload of cash on a bunch of high-end, pre-manufactured utilities.
Conclusion
So, you now know your enemy – that reflected sound you do not want.
Having analyzed your studio situation, you also now know the enemy’s plan of attack. You also have your own strategies of defense. Luckily, this is a battle that can be won over a period of time, so there is no huge rush.
Acoustic treatment does not have to be a stressful or overwhelming endeavor for you. Each and every piece you add helps to create a better environment for your inspirations.
That being said, if you are desperate for better mixes and a more enjoyable experience in your home studio, there is no better time to get started than right now!
And, as far as I see it, that is something to be excited about.
– – –
Jeremy Bongiorno has been a musician and producer for over 15 years. He is an author on his website of a number of articles tips, guides, and evaluations focused on studio and equipment needs. You can contact him at: jeremy@studiofrequencies.com
– – –
Would you like to know when articles more of this sort are posted? Please click here and sign up for the one-time-a-week BDR Newsletter. It only takes 30 seconds.