

The LPFM Guide to Wire and Cable

[January 2014] Building an LPFM station may be on a smaller scale than most full power stations, but attention to using the correct wires and cables is just as important. By doing it right the first time you will go a long way to getting the highest quality audio and rf possible.
Are you going to build one of the new LPFM stations? Or are you caring for the technical needs at one of those already existing stations?
There are thousands of them, and a lot of them are owned and run by people who have never run a radio station before. There are a thousand things you need to know to design, install and run a radio station.
One of the most overlooked subjects is the wire and cable used to hook everything up. This is a very short and simple guide to the six basic kinds of cable you will (probably) need to install for your LPFM station.
Microphone Cable
Professional microphones have “balanced line” outputs. That means they connect with an XLR connector. Figure 1 is a picture of a male and female XLR connector. Each has three connections points.
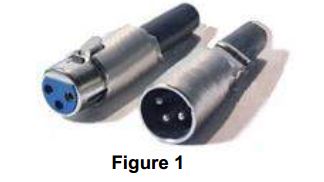
It is best to avoid microphones that are pre-wired or are not 3-conductor balanced lines. Those are not professional.
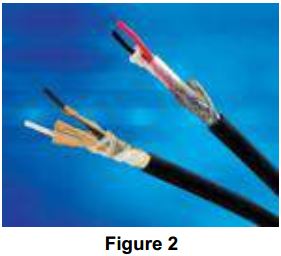
Figure 2 shows the inside of a microphone cable. It has two wires twisted together, a “twisted pair” surrounded by a braid shield.
Cables with foil shields are not appropriate for use with microphones because they make noise when they are bent or flexed.
You can save a lot of money by making your own cables, especially microphone cables.
Some popular Belden microphone cable numbers include: 8412 (all rubber, rugged), 1800F (our highest performance microphone cable), 2221 (same as 1800F but smaller to fit miniature connectors), and 1172A Starquad (low-noise cable). There are also more specialized types, and a variety of colors for easy cable identification.
If this is a school or student-run station, soldering up microphone cables can be a valuable skill to learn. I wrote an article on wiring an XLR. You can read it here.
I also see there are more than a dozen videos on how to make up XLR cables on YouTube.
If you are using microphone boom arms in a studio, be sure the microphone cable is small enough to run through the sections of the boom. If you buy it pre-wired, it will be a crap shoot about the quality or ruggedness of the cable pre-installed.
Line-Level Cable
You will only need to run microphone signals on microphone cables where they will be moved or flexed while in operation. Once that cable plugs in anywhere, it can make a transition to a simpler and cheaper kind of cable.
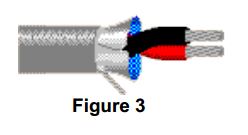
This cable also has a twisted pair and a shield, but it is a foil shield, making the cable cheaper, smaller and easier to install. Figure 3 shows a permanent install “line level” cable. Since the foil inside a line level cable is too thin to connect to, there is a bare wire in contact with the foil that is used as the connection, called a “drain wire.” Our 9451 is our most popular type for analog; the 1800B is for digital use.
Most commonly a microphone signal will be connected to a mixer or console where all the signals are mixed and controlled. The output from the mixer or console is usually amplified to a signal intensity called line level – a million times stronger than microphone level, so line level signals are much harder to interfere with than microphone level (a prime reason to make the microphone cables as short as possible.)
The output of the mixer or console can also run on the same kind of line level cable since it also does not move once it is installed.
You can get cables that contain many twisted pairs, as shown in Figure 4, called multipair or snake cable.
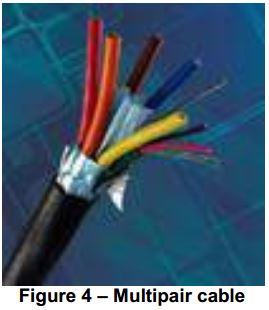
Of course, you have to decide how many pairs you want. Often they come with individual color-coded jackets so you know which pair is which. Bundles from 2-pair to 32-pair are available. If you have a small station, you might not have a use for multipair snake cable, and can wire it all in single pair cable.
Line-level audio cable can be analog or digital. You can even buy cable that can do both. (Digital audio cable can also run analog audio – but not the other way around.)
Control Cable
Almost every box, every device in your studio, will also have wiring to control the functions of that box. Stop, start, record, play, up, down, on, and off are all functions that need to be controlled during broadcasts.
Often the console or mixer gives you remote control so the operator can stop and start (etc.) without reaching somewhere. This requires very simple cables with the correct number of conductors. The number of conductors is determined by the box being controlled. The installation manual of that box will tell you what kind of cable to buy.
Sometimes you can buy only one or two different cables and they will have enough conductors to wire up the control functions of every box. Just be sure you have enough wires. (If there are extra wires left over, you can always leave them unconnected.)
Check to see if the box being wired requires shielded or unshielded cable and buy the appropriate style. Many boxes are now controlled by Ethernet. We will talk about those cables in our next section.
Data Cable
Computer cable, sometimes called premise/data cable, is very common in all broadcast stations.
The most common format run on these cables is Ethernet. The cable varieties are named by categories such as Category 5e, Category 6 and Category 6a. Category 8 will be appearing around 2015. Figure 5 is a picture of some data cables.
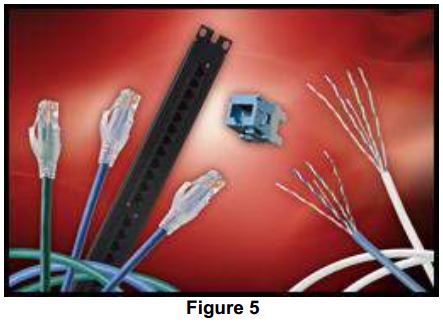
The difference between these categories is in the performance of the cable. First is the speed or bandwidth of the cable. A Category 5e pair has a 100 MHz (Megahertz) bandwidth; Category 6 has 250 MHz per pair; Category 6a is 500 MHz per pair; and Category 8 will probably be 2 GHz (Gigahetz) per pair.
Each cable category is better than the previous one in attenuation, crosstalk, return loss and many other parameters. If you really want to know more about these cables you can buy a book or take a course on Ethernet network design and wiring.
For Category 5e you can put plugs on cables (the cables on the left side of Figure 4). You would buy raw cable (right side of Figure 4) and the appropriate plugs and tools.
On the other hand, by the time you get to Category 6, it becomes much harder to actually build your own cables. A hand-held tester is strongly suggested – one which shows the performance (not just if you got the wires in the right place). Just remember that a Category 6 cable with Category 5e connectors will have Category 5e performance, so be sure and get the right connectors for the cables you are using.
Because it is extremely difficult to put Category 6a cables together many installers buy pre-made patch cords of various lengths. If you do so, just be sure and pick a reputable manufacturer that you can trust. Then you install the network and the jacks (center item in Figure 4) and plug these pre-made cords into the jacks.
You can also get the entire network pre-made, something called “pre-term” wiring. Just provide a list of what cables you need, how long, what Category, fire ratings etc. and they can be pre-made. You just plug-and-play. Of course, doing it yourself is always cheaper, but buying a network tester is not so cheap.
Many audio systems now put multi-channel audio on Ethernet. There is even a new kind of Ethernet (called AVB – Audio Video Bridging) specifically to carry audio on this kind of network. There are some radio stations where 90% of the wiring is Ethernet with just small amounts of regular audio cable.
Speaker Cable
The one place where audio will always be analog is at the speakers. Your ears are analog.
Speaker cable is pretty easy to install. But for a simple cable, you will find that many engineers argue about which speaker cables to use.
If you can hear a difference between two cables, buy the one that sounds most real. If you cannot hear a difference, just remember that bigger wires are better than smaller wires. The bigger wires have lower resistance and so deliver more power from your amplifier to the speakers instead of wasting it in the wire itself. You might like to try our 5T00UP (10 AWG UL-rated) or the 8477 (12 AWG UL-rated).
RF Cable
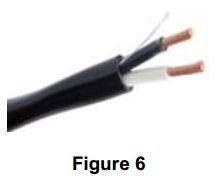
The final link in the chain is the cable from the low-power transmitter to the antenna. This is different from every other cable we considered. Figure 7 shows some coax.
First of all, rf cable is not a twisted pair, it is called a coaxial cable, or coax. It has one conductor and a shield.
This cable carries the power from the transmitter to the antenna. It is of a 50 Ohm impedance, which is specific for coaxes that carry power.

Coax comes in a range of sizes. You choose the correct type by the amount of power they can carry and the power loss (attenuation) for the length you are using.
The 7810 series of RG-8 indoor/outdoor/direct burial cable may be just what you need. 7810A, will, for example run 2 kW at FM.
Bigger coax means lower loss, so your choice ultimately rests on the space you have to install it and the money you can afford to buy the coax.
Conclusion
These are six examples of cables you will use to install your LPFM station. By no means is this a complete list.
There are hundreds, maybe even thousands, of cables you might use in such an installation. But the vast majority will be doing one of the six applications mentioned here.
Of course, there are exceptions to every rule. The equipment you buy, for instance, may require exotic cables not mentioned here. This might be a factor in deciding what gear to buy, especially if that exotic cable needed is hard to find or expensive.
– – –
Steve Lampen is the Multimedia Technology Manager/Product Line Manager for Belden. Belden’s website is: www.belden.com and the customer support line is: 800-235-3361. Or you can always contact him directly with questions, comments or suggestions. His email is: steve.lampen@belden.coms