

Soldering 101: Making a Solid Connection

[April 2014] At some point, every tech needs to do some soldering, either to make a new connection or repair/replacement. Good soldering practices are not that hard to learn, but a tip or two from Dave Dunsmoor can help get it right the first time.
Most people/employers treat soldering as a skill you have probably mastered by birth with if you have any interest in electrical or mechanical things.
But that is not the case. I have seen all manner of soldering over the last many years. But the only employer who made sure I knew how to solder correctly was the Boeing Company. There, every – yes, every – connection was inspected by both Boeing and USAF inspectors before a system was put back into service.
Of course, broadcast engineering systems are not as critical as the stuff I was working on at the time, but it is just as easy to do it right as wrong.
You just have to know what right looks like, and how to do it.
Start With the Right Tools
It should go without saying that it is important to be using the right tools for the project.
It should be, but I have seen too many people trying to do work without something important to the process, such as a brush, a damp sponge, needle nose/clamp, or a braided solder wick.
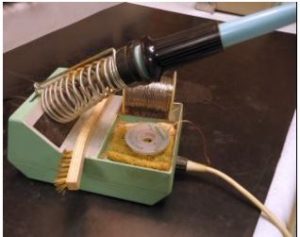
Use the right tool for the job
Getting the right tools – clean tools – in place goes a long way toward successful results.
Clean the Metal
For a solid connection when soldering, every piece to be joined must be clean – “bright metal” clean – in order for the soldering process to work well at all.
That is clean down to the base metal, whether it is copper, tin plated onto copper, gold, silver, whatever.
That is why it always is best to solder new wire (I say “wire” because that is usually what we are soldering), all strands of the wire must be clean. However, sometimes you find that you must re-solder old, oxidized, or corroded wire for some reason, and every strand of the multi-stranded wire involved cannot be cleaned for the entire circumference.
The solution: clean as much as possible, then hope for the best. It usually will work “ok,” just not great.
Cleaning can be done with an old #2 pencil eraser. That works very well. Do not use something more abrasive than that, such as sandpaper or the like if you do not have to. But whatever you do use, make it clean and bright before you proceed.
Use the Least Heat Necessary
Select the right soldering tool and tip. Heating by soldering iron, pencil, etc will accomplish almost any job that is needed to be done, but it always is wise to avoid using more heat than necessary to melt the solder.
Normally a 250-Watt soldering iron is not what you need to replace a part on a printed circuit board. Doing so runs the risk of burning the circuit components or the circuit board itself.
According to the instructors I had at Boeing, it is probably best to avoid using a soldering gun especially when soldering directly to solid-state devices, as the intense magnetic field can have a detrimental effect on them – although I have done it on occasion, and everything “lived.”
If it is necessary to use a soldering gun, apply the solder to the freshly cleaned tip and the wire(s) concurrently after the iron has had a second or two to begin heating each. In other words, do it quickly!
Similarly, you will not get very far with copper strap if you are using a 25 Watt soldering pencil.
Clean Tip and Good Solder Flow
To produce a good solder joint, the tip has to be freshly cleaned by wiping it across a wet sponge or rag, then immediately touched to the pieces to be soldered, followed by applying the solder.
The diameter of the solder should be appropriately sized to the job. Although the solder diameter is not critical, just do not try to use “huge” solder on small connections. My preference is for the solder – I like the multi-core 63/37 mixture – to be something in the range of ¼ to ½ the size of the wire being soldered.
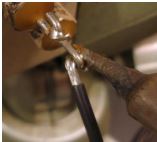 Here is the most important point in the whole process! The solder flows toward the heat source, and this dictates where you place the iron and introduce the solder.
Let the solder flow onto the wire and connection point due to the heat of the wire/connection point being above the melting point of the solder instead of melting the solder with the iron and dabbing it on.
Use just enough solder to make the connection. After soldering, let the solder cool a bit and inspect your connection to ensure the wire is in the right location and the solder spot is smooth.
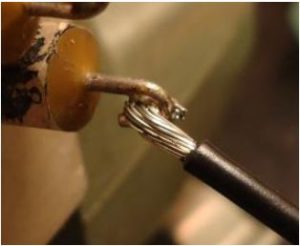
A good joint does not need globs of solder
A “rough” surface is often evidence of a bad solder joint, which usually exhibits a poor or bad connection.
Another important check is to ensure the solder you left is not touching any other component or trace on a printed circuit board. In inadvertent short can cause damage, sometimes even destroying the whole PCB.
By the way, here is a fine point, not completely essential, but a good thing to consider: you do not want solder to flow up under any insulation. I have found this to be a tip that saves a lot of time later.
The reason is because a wire, if flexed or vibrated long enough, will break at the point where the solder flow has ended. If that point is underneath insulation, it will not be immediately obvious when troubleshooting.
Resoldering
Re-soldering by re-flowing the existing solder and adding a bigger dab will work in a pinch, but it is not a good practice.
This sort of approach looks sloppy, does not have as good (low) an electrical connection resistance as a new (or properly re-worked) one, and is more subject to failure again in the future than if it were done it right the first time.
A good inspector will not pass a poor re-solder effort.
Take the Time to Do it Right
The best way is to take the time necessary to rework a solder connection that has failed.
Remove as much of the old solder from the connection point as you can. Solder-wick is excellent for this application.
Then proceed with the joint as if you are working on an entirely new connection.
If you have no wick, then you can use a small coax braid that has been dipped in liquid flux or smeared with a paste flux. (This may be a good time to mention that any flux you use must always be electrical, not plumbing flux.)
A warning that may save you from a major mistake: do not – no, never – use acid-based flux.
Leave a Clean Work Site
Finish your work on a connection by cleaning any/all flux off with a short-bristled brush (½” is long enough) and 100% alcohol.
I cut small paint brushes off for this purpose.
A few moments taken to clean and check the work site and all will be well for a long time.
– – –
Dave Dunsmoor, after 35 years as an FAA technician in Minot, ND, has retired and plans to restore aircraft and contract engineer a bit. Contact Dave at mrfixit@min.midco.net